
With Unity, you can save a lot of time by creating some tools adapted to your specific needs. Right above, a small path editor I made to save me some time when creating enemy patterns in my current project, Red Skies. With just a few click, I quickly design the general shape I want, then I can perfect it using the transform coordinates.
The Unity editor offers a LOT of tools to make yours, but I will just cover some basics in this post, then it will be up to you to look at the APIs to discover hidden gems.
WARNING: This post is ALL about code, with (commented) snippets rather than theory; that’s the way I like to learn, I hope I’m not alone!
Custom inspector
The most common tool you can use to make your life easier is custom inspector.
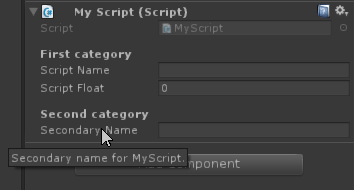
A very basic way to improve your inspectors is to use Property Attributes, which do not require to rewrite the entire inspector, but rather make it more readable:
|
using UnityEngine;
public class MyScript : MonoBehaviour { [Header(“First category”)] [Tooltip(“Primary name for MyScript.”)] public string scriptName; public float scriptFloat;
[Header(“Second category”)] [Tooltip(“Secondary name for MyScript.”)] public string secondaryName; } |
And then you can go pretty crazy with the custom inspectors themselves. Those scripts are editor-side only (they have to inherit from Editor and be placed in a folder called Editor) and let you write what you want, how you want, in the inspector when an instance of your script is selected. There is a ton of functions to experiment with, that can be found in various editor classes such as EditorGUILayout, GUILayout, EditorGUIUtility and many others, ranging from simple to highly customizable.
|
using UnityEngine; using UnityEditor;
//This line will automatically call your custom editor for instances of MyScript [CustomEditor(typeof(MyScript))] public class MyScriptInspector : Editor { //Keep a reference on your style rather than regenerating them every update GUIStyle headerStyle;
//This custom inspector will generate random ids in order to display a list to // the user from which he can then choose bool choosingNewId = false; //Are options displayed? string[] newIds; //Random ids generated to choose from
public override void OnInspectorGUI() { //The member “target” allow you to grab a ref to the instance of your component MyScript myScriptTarget = (MyScript) target;
//Init styles if(headerStyle == null) { InitStyles(); }
EditorGUILayout.Space(); EditorGUILayout.LabelField(“First Category”, headerStyle); EditorGUILayout.LabelField(“Script id: ” + myScriptTarget.scriptName);
//If player has already clicked on the “Generate new name” button, // then we only display the generated options if(choosingNewId) { for(int i = 0; i < newIds.Length; i++) { if(GUILayout.Button(newIds[i])) { myScriptTarget.scriptName = newIds[i]; choosingNewId = false; } } } else if(GUILayout.Button(“Generate new name”)) { newIds = new string[] { Random.Range(0, int.MaxValue).ToString(), Random.Range(0, int.MaxValue).ToString(), Random.Range(0, int.MaxValue).ToString() }; choosingNewId = true; } }
void InitStyles() { headerStyle = new GUIStyle(); headerStyle.fontStyle = FontStyle.Bold; headerStyle.normal.textColor = Color.yellow; } } |
Note that I could have used a PopUp to display the choices in another way (there are many other solutions, I guess, but the EditorGUILayout.PopUp is pretty neat).
You just indicate the class for which you want to make your custom inspector, then the OnInspectorGUI is ready to make all your dreams come true. The EditorGUILayout and GUILayout classes are usually the more convenient to use, since you don’t have to handle the position and size of your elements, but you can use EditorGUI and GUI as well for very precise display (you could recreate, say, a color picker in the inspector by drawing a bunch of colored pixels and using the events of the mouse).
There are of course some limitations and tricky cases, but it’s up to you to find out about those according to your needs.
Editor windows
Did I speak about your custom color picker? Well why not, after all! Let’s make it in a small window, so that it doesn’t take all the space in the inspector. Editor windows use the same apis as custom inspector. To spice things up, we’ll allow the user to select the amount of color he wants to be able to choose from. (It’s not a course about color, so forgive me if my color theory isn’t perfect!)
|
using UnityEngine; using UnityEditor;
public class DiscreteColorPicker : EditorWindow { //Create and open a discrete color picker [MenuItem(“Window/Open Discrete color picker”)] public static void OpenDiscreteColorPicker() { DiscreteColorPicker windowInstance = ScriptableObject.CreateInstance<DiscreteColorPicker>(); windowInstance.Init(); windowInstance.Show(); }
int division = 1; //Base value to calculate amount of available colors int colorAmount { //There are {pickerTextureHeight} base color to choose from, each generating // a grid of {luminosityTextureSize}*{luminosityTextureSize} tints, with // the last line being only black squares. get { return pickerTextureHeight * luminosityTextureSize * luminosityTextureSize – luminosityTextureSize + 1; } }
Color currentBaseColor; //Current selected base color
Vector2 currentLuminosityCoordinates; //Coordinates of selected tint in luminosity texture float currentMainColorY = -1f; //Coordinate of selected base color
Texture2D pickerTexture; //Texture containing the base colors Texture2D luminosityTexture; //Texture based on the current base color with luminosity variations Texture2D cursorTexture; //Texture used to display cursors Texture2D sampleColorTexture; //Texture containing final color
int pickerTextureHeight { get { return division * 6; } } int luminosityTextureSize { get { return division * 3; } }
int pickerSize = 300; //GUI object size
bool draggingLuminosity; //Is user dragging from luminosity square bool draggingColor; //Is user dragging from color picker
void OnGUI() { EditorGUILayout.LabelField(“Discrete color”);
EditorGUI.indentLevel++;
//First, a slider to decide the amount of colors bool needsUpdate = false; int newDivision = EditorGUILayout.IntSlider(“Color levels:”, division, 1, 30, GUILayout.MaxWidth(pickerSize)); if(newDivision != division) { //If division changed, update luminosity coordinates to currentLuminosityCoordinates *= ((float) newDivision) / ((float) division); division = newDivision;
//Then regenerate textures, since their size has changed RegenerateTextures(); needsUpdate = true; } EditorGUILayout.LabelField(“=> “ + colorAmount + ” colors”); GUILayout.Space(10);
//Reserve a rect in the windows, where we can draw with GUI functions, and that // GUILayout functions will consider as already filled Rect colorPickerRect = GUILayoutUtility.GetRect(EditorGUIUtility.currentViewWidth, pickerSize);
//Draw luminosity texture Rect luminosityRect = new Rect(colorPickerRect); luminosityRect.x += 5; luminosityRect.width = pickerSize; GUI.DrawTexture(luminosityRect, luminosityTexture, ScaleMode.StretchToFill, false, colorPickerRect.width/((float) luminosityTextureSize));
//Draw small black dot to show which color is selected Rect luminosityCursorRect = new Rect(luminosityRect); luminosityCursorRect.position += new Vector2((int) currentLuminosityCoordinates.x, (int) currentLuminosityCoordinates.y) * pickerSize / ((float) luminosityTextureSize); luminosityCursorRect.y = luminosityRect.height – luminosityCursorRect.y + 2*luminosityRect.y; luminosityCursorRect.position += new Vector2(0, -5f); luminosityCursorRect.size = new Vector2(5, 5); GUI.DrawTexture(luminosityCursorRect, cursorTexture);
//Draw color picker colorPickerRect.x += luminosityRect.width + 10; colorPickerRect.width = 20; GUI.DrawTexture(colorPickerRect, pickerTexture);
//Draw small black line to show which color is selected Rect colorPickCursorRect = new Rect(colorPickerRect); colorPickCursorRect.y = colorPickerRect.y + currentMainColorY * colorPickerRect.height; colorPickCursorRect.height = 1; GUI.DrawTexture(colorPickCursorRect, cursorTexture);
//Check if user is beginning or ending a drag in one of the pickers if(Event.current.type == EventType.MouseDown) { if(luminosityRect.Contains(Event.current.mousePosition)) { draggingLuminosity = true; } else if(colorPickerRect.Contains(Event.current.mousePosition)) { draggingColor = true; } else { draggingLuminosity = false; draggingColor = false; } } else if(Event.current.type == EventType.MouseUp) { draggingLuminosity = false; draggingColor = false; }
//Warning: OnGUI can be called for different event types; you only want to use some of them, since // during others the layout is being constructed and values will be wrong bool input = Event.current.type == EventType.MouseDown || Event.current.type == EventType.MouseDrag; if(input) { Vector2 mousePosition = Event.current.mousePosition; if(draggingLuminosity) { //Calculate new coordinates in luminosity texture Restrain(ref mousePosition, luminosityRect); Vector2 coordinates = mousePosition – luminosityRect.position; coordinates *= luminosityTextureSize / luminosityRect.width; currentLuminosityCoordinates = new Vector2((int) coordinates.x, luminosityTextureSize – 1 – ((int) coordinates.y)); needsUpdate = true; } else if(draggingColor) { //Calculate new base color and regenerate luminosity texture Restrain(ref mousePosition, colorPickerRect); currentMainColorY = (mousePosition.y – colorPickerRect.position.y) / colorPickerRect.height; int textureY = (int) ((1f – currentMainColorY) * pickerTextureHeight); currentBaseColor = pickerTexture.GetPixel(0, textureY); RecalculateLuminosityTexture(); needsUpdate = true; } }
if(needsUpdate) { //A change has been made, sample texture has to be updated sampleColorTexture.SetPixel(0, 0, luminosityTexture.GetPixel((int) sampleColorTexture.Apply(); Repaint(); }
GUILayout.Space(10);
//Draw currently selected color to sample texture Rect sampleColorRect = GUILayoutUtility.GetRect(1, 20); sampleColorRect.x += 5; sampleColorRect.width = pickerSize + 20; GUI.DrawTexture(sampleColorRect, sampleColorTexture);
EditorGUI.indentLevel–; }
//Simple helper function void Restrain(ref Vector2 v, Rect r) { v.x = Mathf.Min(r.x + r.width – 1f, Mathf.Max(r.x + 1f, v.x)); v.y = Mathf.Min(r.y + r.height – 1f, Mathf.Max(r.y + 1f, v.y)); }
//Each time the base color changes, the luminosity texture has to be updated void RecalculateLuminosityTexture() { Color rowColor; Color rowGreyColor; for(int i = 0; i < luminosityTextureSize; i++) { //Row by row, simple lerp of two vertical gradients (white to black on the left, // base color to black on the right) rowColor = currentBaseColor * ((float) (luminosityTextureSize – i – 1)) / ((float) (luminosityTextureSize – 1)); rowGreyColor = Color.white * ((float) (luminosityTextureSize – i – 1)) / ((float) (luminosityTextureSize – 1)); rowColor.a = 1; rowGreyColor.a = 1; for(int j = 0; j < luminosityTextureSize; j++) { luminosityTexture.SetPixel(j, luminosityTextureSize – i – 1, Color.Lerp(rowGreyColor, rowColor, ((float) j)/((float) (luminosityTextureSize – 1)))); } } //Don’t forget to call Apply after you change a texture, or it won’t // have any effect luminosityTexture.Apply(); }
//Regenerate all the texture, because they don’t exist yet or because // their size was changed void RegenerateTextures() { //Just create a texture and fill it with basic rainbow // There must be a name for that, sorry I don’t know it // (…and there must be a better way to do it, but it’s not the point) pickerTexture = new Texture2D(1, pickerTextureHeight); pickerTexture.filterMode = FilterMode.Point; Color colorInProgress = Color.red; float increment = 6f / ((float) pickerTextureHeight); for(int i = 0; i < 6; i++) { for(int j = 0; j < pickerTextureHeight / 6; j++) { int index = i * pickerTextureHeight / 6 + j; pickerTexture.SetPixel(0, index, colorInProgress); //Grab current base color to setup cursor in color picker at init if(colorInProgress == currentBaseColor && currentMainColorY < 0) { currentMainColorY = 1f – (1f / (2f * pickerTextureHeight) + ((float) index) / ((float) pickerTextureHeight)); } switch(i) { case 0: colorInProgress.g += increment; break; case 1: colorInProgress.r -= increment; break; case 2: colorInProgress.b += increment; break; case 3: colorInProgress.g -= increment; break; case 4: colorInProgress.r += increment; break; case 5: colorInProgress.b -= increment; break; } } } pickerTexture.Apply(); int textureY = (int) ((1f – currentMainColorY) * pickerTextureHeight); currentBaseColor = pickerTexture.GetPixel(0, textureY);
luminosityTexture = new Texture2D(luminosityTextureSize, luminosityTextureSize); luminosityTexture.filterMode = FilterMode.Point; RecalculateLuminosityTexture();
sampleColorTexture = new Texture2D(1, 1); sampleColorTexture.SetPixel(0, 0, luminosityTexture.GetPixel((int) sampleColorTexture.Apply(); }
//Init default values and create cursor texture, since it won’t be updated after void Init() { currentBaseColor = Color.red; currentLuminosityCoordinates = new Vector2(luminosityTextureSize – 1, luminosityTextureSize – 1);
RegenerateTextures();
cursorTexture = new Texture2D(1, 1); cursorTexture.SetPixel(0, 0, Color.black); cursorTexture.Apply(); } } |
Of course there must be some more convenient and/or efficient ways of doing that (like using the default color picker from Unity – random example), but you can see that there is virtually no limit to what you can do, it’s more a matter of time and perseverance.
However we won’t go very far with this window, in term of utility… Let’s say we want to change that, and have a DiscreteColor struct that can be tweaked from the inspector like a standard color. For that, we will use a Property Drawer to customize the field shown in the inspector.
First we need a DiscreteColor struct and an object to use it as public field:
|
using UnityEngine;
public class MyScript : MonoBehaviour { public DiscreteColor[] myColors; }
//You have to make the class serializable so it can be used with a custom // property drawer [System.Serializable] public struct DiscreteColor { //Make the private fields serializable so they are saved [SerializeField] int colorsDivision; [SerializeField] float baseColor; [SerializeField] Vector2 luminosityCoordinates;
//Public field is automatically serializable public Color resultColor; } |
Then we need to create the custom property drawer itself, that will use a slightly changed DiscreteColorPicker:
|
using UnityEngine; using UnityEditor;
//Indicate we are creating a custom property drawer for the DiscreteColor type [CustomPropertyDrawer(typeof(DiscreteColor))] public class DiscreteColorDrawer : PropertyDrawer { //Override the line height used to display the property in the inspector const float propertyHeight = 30; //Texture to display a sample of the selected color Texture2D colorSample;
// Draw the property inside the given rect public override void OnGUI(Rect position, SerializedProperty property, GUIContent label) { //Find all the serialized attributes of the DiscreteColor SerializedProperty serializedColorsDivision = property.FindPropertyRelative(“colorsDivision”); SerializedProperty serializedBaseColor = property.FindPropertyRelative(“baseColor”); SerializedProperty serializedLuminosityCoordinates = property.FindPropertyRelative(“luminosityCoordinates”); SerializedProperty serializedFinalColor = property.FindPropertyRelative(“resultColor”);
//Using BeginProperty / EndProperty on the parent property means that // prefab override logic works on the entire property. EditorGUI.BeginProperty(position, label, property);
//Default int value is 0, which is not an accetable value for our colors division serializedColorsDivision.intValue = Mathf.Max(serializedColorsDivision.intValue, 1);
//The final color field was added only to avoir having to recalculate it from our weird parameters // By default it’s clear, so set its alpha to 1, since we don’t use alpha. Color finalColor = serializedFinalColor.colorValue; finalColor.a = 1;
//Create a GUIStyle to display the selected color with the button text GUIStyle buttonStyle = new GUIStyle(“button”); GUIStyleState activeState = buttonStyle.active; activeState.textColor = finalColor; GUIStyleState normalState = buttonStyle.normal; normalState.textColor = finalColor;
//Create the sample texture if it doesn’t exist and fill it with the final color if(colorSample == null) colorSample = new Texture2D(1, 1); colorSample.SetPixel(1, 1, finalColor); colorSample.Apply();
//Display the sample as a little square on the left Rect sampleRect = new Rect(position.x, position.y, propertyHeight, propertyHeight); GUI.DrawTexture(sampleRect, colorSample);
//Display a button to open the color picker and link it to the current property Rect buttonRect = new Rect(position.x + propertyHeight + 5, position.y + 5, position.width – 10 – propertyHeight, propertyHeight – 10); if(GUI.Button(buttonRect, “Set color”, buttonStyle)) { DiscreteColorPicker.OpenWithColor(property.serializedObject, serializedColorsDivision, serializedBaseColor, serializedLuminosityCoordinates, serializedFinalColor); }
EditorGUI.EndProperty(); }
//Override the line height used to display the property in the inspector public override float GetPropertyHeight(SerializedProperty property, GUIContent label) { return propertyHeight; } } |
And the changes in the DiscreteColorPicker:
|
using UnityEngine; using UnityEditor;
public class DiscreteColorPicker : EditorWindow { //Opens a picker with the serialized fields of a DiscreteColor public static DiscreteColorPicker OpenWithColor(SerializedObject serializedObject, SerializedProperty serializedColorsDivision, SerializedProperty serializedBaseColor, SerializedProperty serializedLuminosityCoordinates, SerializedProperty serializedFinalColor) { DiscreteColorPicker windowInstance = ScriptableObject.CreateInstance<DiscreteColorPicker>(); windowInstance.Init(serializedObject, serializedColorsDivision, windowInstance.Show(); //Picker is returned so that the custom property drawer can get values return windowInstance; }
//Keep a reference on the serialized fields SerializedObject serializedObject; SerializedProperty serializedColorsDivision; SerializedProperty serializedBaseColor; SerializedProperty serializedLuminosityCoordinates; SerializedProperty serializedFinalColor;
//Keep the final color so that it can be given back to the DiscreteColor // without having to recalculate it Color currentFinalColor;
…
void OnGUI() {
…
if(needsUpdate) { //A change has been made, sample texture has to be updated currentFinalColor = luminosityTexture.GetPixel((int) currentLuminosityCoordinates.x, (int) currentLuminosityCoordinates.y); sampleColorTexture.SetPixel(0, 0, currentFinalColor); sampleColorTexture.Apply(); Repaint();
//Final color has changed, we set the new values in the serialized fields if(serializedObject != null) { serializedColorsDivision.intValue = division; serializedBaseColor.floatValue = currentMainColorY; serializedLuminosityCoordinates.vector2Value = currentLuminosityCoordinates; serializedFinalColor.colorValue = currentFinalColor; //Save your changes serializedObject.ApplyModifiedProperties(); }
… …
//Init the window with the serialized properties void Init(SerializedObject _serializedObject, SerializedProperty _serializedColorsDivision, SerializedProperty _serializedBaseColor, SerializedProperty _serializedLuminosityCoordinates, SerializedProperty _serializedFinalColor) { serializedObject = _serializedObject; serializedColorsDivision = _serializedColorsDivision; serializedBaseColor = _serializedBaseColor; serializedLuminosityCoordinates = _serializedLuminosityCoordinates; serializedFinalColor = _serializedFinalColor;
division = serializedColorsDivision.intValue; currentMainColorY = serializedBaseColor.floatValue; currentLuminosityCoordinates = serializedLuminosityCoordinates.vector2Value;
RegenerateTextures();
cursorTexture = new Texture2D(1, 1); cursorTexture.SetPixel(0, 0, Color.black); cursorTexture.Apply(); }
//Close the window when user clicks somewhere else. There seems to be a bug with // this in current Unity version (even with system windows), which sometimes causes // a crash… so don’t use it in your commercial production, maybe. void OnLostFocus() { serializedObject = null; Close(); } } |
You can as well build entire systems for game settings, accessible from menus, that parse assets in your project, save data to txt or asset files, modify prefabs… You can have access to or even set the selected object in the project tab, find all subclasses of a given class to create assets from scratch, open, modify and save scenes… You’ve got it: it’s powerful.
Scene view
It can also be very useful to build tools directly in the scene view, especially for things like level design. And guess what: it’s as simple as what we’ve seen so far! You just register to the scene GUI delegate, then use the Handles to reach your goal. Here is a simple example reproducing the first gif of this post:
And the code to do that:
|
using UnityEngine;
//Import UnityEditor only when on editor, in order to be able to build project #if UNITY_EDITOR using UnityEditor; #endif
//In order to have the code running while application is not playing [ExecuteInEditMode] public class Path : MonoBehaviour { public Transform[] waypoints;
void Start () { //When in the editor not playing, register to callback allowing // to draw on the Scene view. Unregister first if the delegate // had previously been added if(!Application.isPlaying) { #if UNITY_EDITOR SceneView.onSceneGUIDelegate -= OnSceneGUI; SceneView.onSceneGUIDelegate += OnSceneGUI; #endif } }
protected virtual void OnDestroy() { //Unregister if the object is destroyed if(!Application.isPlaying) { #if UNITY_EDITOR SceneView.onSceneGUIDelegate -= OnSceneGUI; #endif } }
#if UNITY_EDITOR void OnSceneGUI(SceneView sceneView) { //Check if this object or one of its children is selected bool isOnMe = Selection.activeGameObject == gameObject; if(!isOnMe) { for(int i = 0; i < transform.childCount; i++) { if(Selection.activeTransform == transform.GetChild(i)) { isOnMe = true; break; } } }
if(isOnMe) { //If there are no waypoint yet, create the array and initialize it with // a spawn point if(waypoints == null || waypoints.Length == 0) { Vector3 newSpawnPointPos = Vector3.zero; GameObject newSpawnPointGo = new GameObject(); newSpawnPointGo.transform.SetParent(transform); waypoints = new Transform[1]; waypoints[0] = newSpawnPointGo.transform; newSpawnPointGo.transform.position = newSpawnPointPos; }
//Draw the spawn point and name it //Check if it isn’t null, in case user has deleted it if(waypoints[0] != null) { waypoints[0].gameObject.name = “Spawn”;
//Display the spawn point handle in red Handles.color = Color.red;
//The handle can be moved by the user and returns its new position, // so reassign it to the transform waypoints[0].position = Handles.FreeMoveHandle(waypoints[0].position, Quaternion.identity, 0.2f, Vector3.zero, Handles.DotCap); }
//Draw the rest of the path for(int i = 1; i < waypoints.Length; i++) { //Always check for a null transform if(waypoints[i] != null) { waypoints[i].gameObject.name = “WP” + i.ToString(); Vector3 position = waypoints[i].position;
//We’ll draw a line between the waypoints, from the previous one // to the current one if(waypoints[i – 1] != null) { Handles.color = Color.blue; } if(i == waypoints.Length – 1) Handles.color = Color.black; //Otherwise, show it green else Handles.color = Color.green;
//Create the handle to move it waypoints[i].position = Handles.FreeMoveHandle(position, Quaternion.identity, 0.2f, Vector3.zero, Handles.DotCap);
} }
//Finally, after the last waypoint, display a button to create another one int maxIndex = waypoints.Length – 1; if(waypoints[maxIndex] != null) { Vector3 newWPPosition = waypoints[maxIndex].position + new Vector3(0.5f, 0); Handles.color = Color.cyan; //Create the clickable handles button if(Handles.Button(newWPPosition, Quaternion.identity, 0.2f, 0.2f, Handles.DotCap)) { //If clicked, create the new waypoint GameObject newWP = new GameObject(); newWP.transform.SetParent(transform); Transform[] newPath = new Transform[maxIndex + 2]; for(int j = 0; j < maxIndex + 1; j++) { newPath[j] = waypoints[j]; } waypoints = newPath; waypoints[waypoints.Length – 1] = newWP.transform; newWP.transform.position = newWPPosition; } //Add a “+” label on the button, scaled according to button size float handleSize = HandleUtility.GetHandleSize(newWPPosition); Handles.color = Color.black; GUIStyle buttonStyle = new GUIStyle(); buttonStyle.fontSize = (int) (25f/handleSize); Handles.Label(newWPPosition + new Vector3(-0.12f, 0.2f), “+”, } } } #endif } |
That’s all! As said at the beginning of the post, this was just a very light overview of the possibilities offered by Unity’s editor, but the doc is quite nice, and there are tons of questions and answers on the webz about this subject. All the examples given here are small scripts, but you can build mad interfaces with all the options your game designers have always dreamed of without thinking it could come true someday. It will save you a crazy amount of time!
For more articles, you can follow me on Twitter, Facebook or subscribe to this blog.
Further “readings”:
A great video about Editor Scripting (the one that got me into this)
THE thread to talk about serialization
